|
|
13) Save the file as a transparent GIF using the Export Transparent Image... feature or the File>Save for Web... Feature |
|
 |
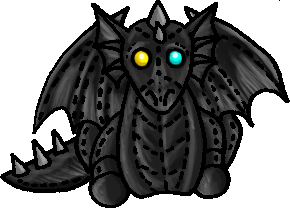
14) reopen your saved file and use the pencil to reinforce the black outline on the pose (if needed) and the eraser to get rid of stray pixels that may have occured. This will USUALLY only happen when you resized the image before saving it as a GIF file. (example: dragonsit-R.GIF). Remember that sometimes you WILL have to resize unless you drew the pose exactly the right dimensions either on paper or on the screen, so make use of the ZOOM tool and destroy stray pixels that may infest your end product. Once this is done, save it again and then goto Image> Rotate Canvas > Flip Horizontal to make your opposite direction pose. From there, goto File > Save As... and save it as something else (ie. dragonsit-L.GIF) |
 |
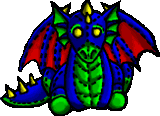
Your end result should be something like this, ready to be uploaded to the image editor (like this one) or directly to your pose list, if you custom colored it to your own colors directly. :) Finis. |
 |
Squeak! See you next time! |
||
 |